In this article, we will learn how to auto-clear browsing data in Chrome on exit using different methods and how Chrome clear cache on exit is beneficial for everyone.
Surfing the internet over an internet browser creates history. If you are using your friend’s computer /laptop or using a public computer in a cafe, then it is obvious that you don’t want others to know what you are searching for. In a situation like this you can Automatically Delete Browsing History in web browser will be very helpful.
We posted various tutorials on Chrome, and similar to this, we had an article on how to Disable Autofill on Chrome.
You don’t need to remember to clear search history; this Internet trick will delete browsing history on exit. This tutorial is not only for any specific browser. Solution Exist is providing you with a tutorial on automatic deletion browsing on Chrome, Mozilla Firefox, and Internet Explorer. We mostly use any web browser.

Before we get into the tutorial, let’s have a quick introduction to what the history and cookies in the browser are and why it is necessary to clean cache and cookies.
Table of Contents
Auto Clear Browsing Data In Chrome, Firefox and Edge
Solution Exist is providing a tutorial on how to clear browsing history in various web browsers, such as Google Chrome, Mozilla Firefox, and Internet Explorer. So, without wasting more time, start reading the tutorial and follow it according to your internet browser.
Steps To Auto Delete Browsing History In Google Chrome
Can I set Chrome to clear cache on exit? the simple answer is yes,
Initially, there was no option for auto history delete in but not, but developers had included the option. Here are the two methods to automatically clear cache.
- Using setting option
- Using Auto clear cache Chrome extension
Let’s start with Auto clear browsing history in Chrome when Closing browser.
Step 1 : You can set up Google Chrome to automatically clear your browsing history when you exit the browser by following these steps:
Step 2 : Open Google Chrome on your computer.
Step 3 : Click on the three dots in the top right-hand corner of the browser window.
Step 4 : Now Select “Settings” option from the menu and then scroll down to the bottom of the Settings page and click on “Advanced.”
Step 5 : Under “Privacy and security,” click on “Site settings.” and then Click on “Cookies and site data.”
Step 6 : Toggle on the option that says “Clear cookies and site data when you quit Chrome.”
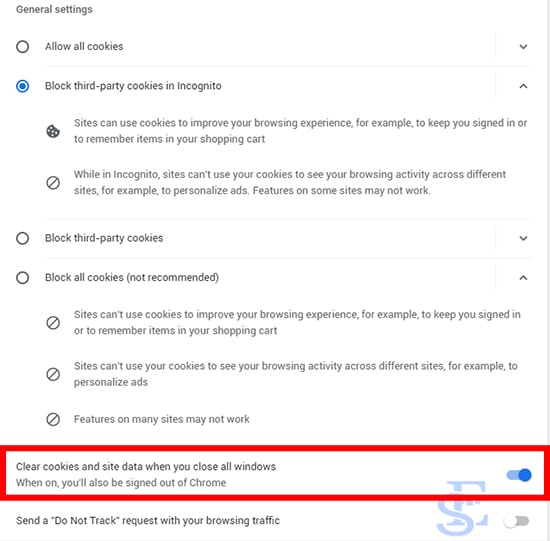
You can also choose to keep certain cookies or site data by clicking on “Add” and entering the website’s URL.
Close the Settings tab, and your browser will now automatically clear your browsing history, cookies, and site data every time you exit Google Chrome.
Note: This setting will also clear your login credentials, so you'll need to re-enter them each time you revisit a website. Additionally, if you have any extensions installed that save data or browsing history, this setting may not affect them.
This trick automatically deletes browsing history. They are a little bit of tricks, but Solution Exist still has the solution and will provide a simple trick/way to Chrome clear history on exit. To do so, we need to install an extension, which will help you to achieve your clear history goals. Without wasting more time, let’s get right into it.
Extension to auto history wipe | clear history on exit chrome
It provides various Auto Clear history extensions that can help you clear cache and history with simple tricks. Here is the step-by-step solution.
Step 1 : Firstly you need to download Click & Clean extension from Store and install it

As you install it you will get an icon on the top right side of the screen.
Step 2 : Now click on the icon, and you will see a window popup on the screen. Click on Option, and you will get a new window opened on the screen.
Step 3 : Tick the option that you want to get delete automatically when chrome exit.
Step 4 : After selecting all options, click on Delete private data when Chrome closes. [Open Image to see in full size]
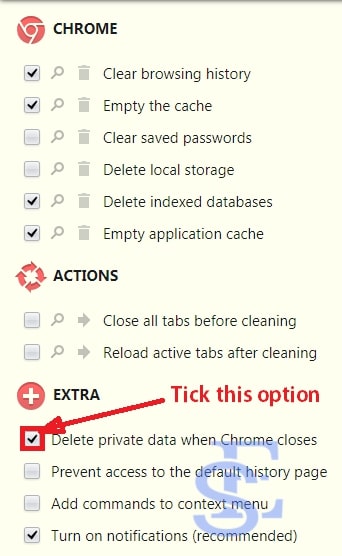
Step 5 : Done..!! In this way, you can delete your search history.
Steps To Auto Delete Browsing History In Mozilla Firefox
I personally use Mozilla Firefox to surf the internet on a computer and I use this Internet trick. I find it very helpful to delete search history automatically in Firefox. This will help you delete browsing, search, and download history on Firefox. So, without wasting more time, let’s get into the steps.
Step 1 : Firstly, Click the Three Line button (situated at the top left) button. Choose Options.
Step 2 : You will get a new window. Choose privacy.
Step 3 : Now select Use custom setting for History in the History tab. Now tick Clear history when firefox closes and now open Setting.
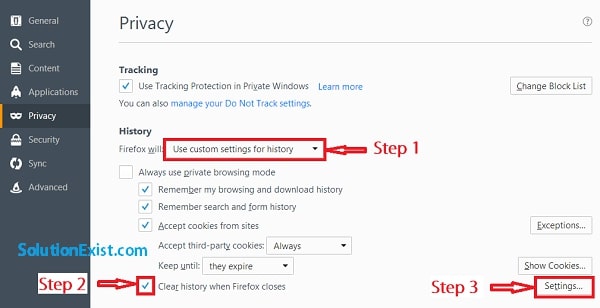
Step 4 : Now select the things that you want to be clear when Firefox close and click on OK.
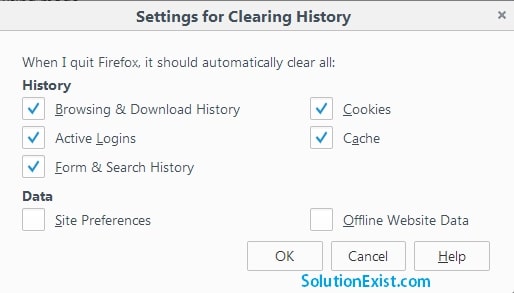
Done..!! In this way you can clear your search history when Firefox closed.
Enable Edge Auto Delete Browsing History on Exit
Like Mozilla Firefox and Chrome, Microsoft Edge browser provides a convenient way to ensure your browsing history is kept private. With its new auto-delete feature, Edge makes it easy to automatically delete your browsing history at the end of each session. In the steps below, we will discuss the auto-delete feature and how users can set it up and customize their settings.
To enable Edge Auto Delete Browsing History on Exit, follow these steps:
Step 1 : Open Microsoft Edge browser and Click on the three dots (…) in the upper right-hand corner of the edge.
Step 2 : Now Click on “Settings” at the bottom of the drop-down menu, scroll down, and click on “Privacy search and services” in the left-hand menu.
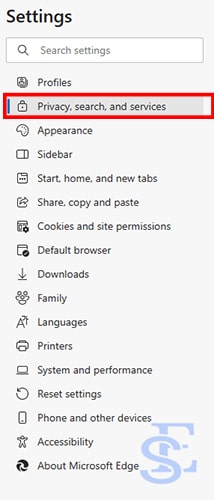
Step 3 : Now, Under the “Clear browsing data” section, click on “Choose what to clear every time you close the browser.”

Step 4 : Toggle on the switch next to “Browsing history” to enable auto-deletion of browsing history on exit.
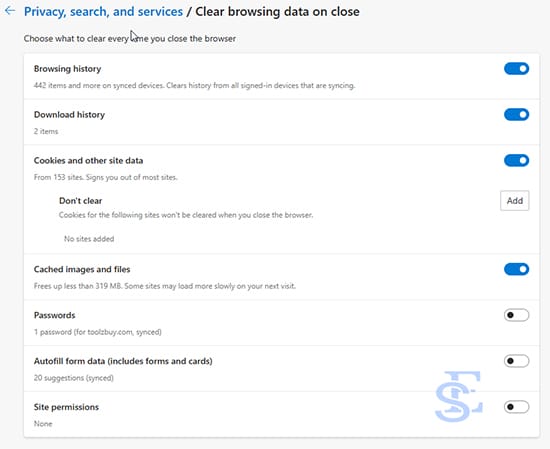
Step 5 : Optionally, you can also toggle on other items you want to clear, such as cookies and cached data.
Step 6 : Close the settings tab and you are done with the process.
From now on, Edge will automatically clear your browsing history every time you close the browser.
Steps To Auto Delete Browsing History In Internet Explorer
Not everyone is using Internet Explorer but in some case if you are using Internet Explorer then you will definitely need this tutorial.
Step 1 : Click on “Tools”. Then, move over to “Internet OptionsI”.
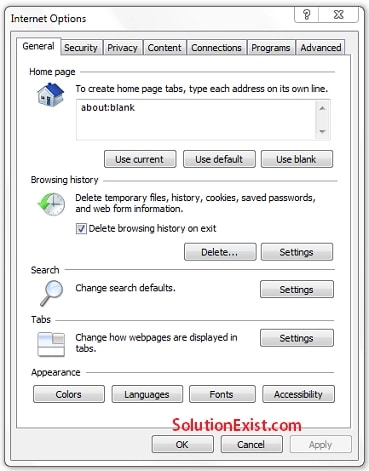
Step 2 : Under General Tab, check “Delete browsing history on exit”.
Done..!!, isn’t that easy
FAQ (auto clear browsing data chrome)
1. How do I clear my history in Google?
Below are the steps that you need to follow.
1. Open Google Chrome on your computer.
2. Click on the three dots in the top right-hand corner of the browser window.
3. Select “History” from the drop-down menu.
Click on “Clear browsing data” on the left-hand side of the screen.
5. Select the time range for which you want to clear your search history.
6. Check the box next to “Browsing history” to select it.
You can also choose to clear other types of data, such as cookies and cached images and files.
7. Once you have selected the data you want to clear, click on “Clear data” at the bottom of the screen.
Your search history will now be cleared from Google Chrome.
2. What are clear history extensions in Chrome?
Different extension are there to delete history on exit chrome such as Ultimate Auto History Cleaner, Click&Clean and History & Cache Cleaner.
3. Can I set Chrome to delete history on exit?
Yes, like Firefox and Microsoft Edge, you can do it. You need to activate Clear cookies and site data when you quit Chrome option form setting.
Wrapping Up
This was a simple tutorial on Auto-Clearing Browsing Data In Chrome, Mozilla Firefox, Microsoft Edge, and Internet Explorer. In Google Chrome, you can use the default feature to auto-wipe history. This was our whole tutorial on Auto-Deleting Browsing History. If you have any problem following this tutorial, do use the comment section. We at the Solution Exist team will help you to deal with it.
